Client Access General Configuration
Client Access is a tool that enables client contacts to access specific areas of their account information at any time. Setup options can be applied within Nexsure that enable the agency to control the information that is displayed to the client. Use the following guidelines to set up and manage the Client Access portal.
Note: Along with the selections noted in this topic, the client contact must be made into a user. See the Client Access Setup topic for more information.
To Set Up Client Access
- On the Utility menu, click SETUP.
- In the Setup Console, click Client Access. Brief reference material is displayed.
- In the Setup Console, click Configuration > General. The Client Access General Configurations screen is displayed.
- In the Client Login area, the following options are available:

- In the How will users access the client login? area, two options are available:
- Portal.Nexsure.Com: Choose this option to allow contacts to directly log into the client access portal. Simply give the http://Portal.Nexsure.com URL to the client and they will be able to access the system using the Login Name and Password set up in the contact record at client details > contacts tab > contact details > security tab. The contact will receive a welcome email that gives them the http://Portal.Nexsure.com URL.
- Login from my site: Choose this option to allow contacts to access the system via another Web site. Enter the URL for the Web site and the system will generate sample code that can be used to embed the client access portal into an existing Web site.
- View Sample Code: To simplify the integration process, click on the [View Sample Code] link after the Web site URL has been entered and Nexsure will create the HTML code necessary to integrate a direct portal from a custom Web site. The code on this page can then be used as a template and updated with custom information.
- Web Site URL: If the Login from my site option is selected above, enter the full web site address for the page in which the client access portal will be embeded.
- Integration Key: The integration key is generated by Nexsure and must be used by the integration site for the portal to Nexsure to work properly. The integration HTML page will include a hidden field named "integration_key" and the value of the organization's unique key.
- Client Access Integration Document: Click the [Download] link to access a PDF version of the Client Access Integration document. This document will give details of how to integrate the client access portal with an existing Web site.
- In the Client Login area, when all entries have been made, click [Save]. Nexsure will then save all entered values.
- In the Status area on the configuration screen the following options area available:
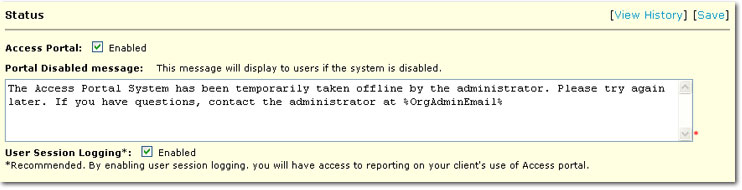
- Enable Access Portal: The Client Access portal can be enabled or disabled. If the check box is not selected, the Client Access portal is disabled. Clients will not be able to access the system and a portal disabled message will be displayed to the clients that try to access the system.
- Comments: Information about why Client Access has been enabled or disabled is collected each time the portal status is changed and [Save] is clicked. This information is collected and can be viewed by clicking the [View History] link.
- Portal Disabled message: A message must be added that will be displayed when Client Access is disabled. The message can be customized to include an email address to which clients can send responses. Enter the desired message or use the default message to be displayed when the system is not available. Up to 200 characters can be entered into the message box.
- User Session Logging*: The client access portal can track the client's activities for reporting purposes. If logging is enabled, each client session will be tracked. The tracking information will be used for statistics and reporting in the Utilization Summary Report.
- Click [Save] to save the selections.
Note: If the portal is enabled, [Save] cannot be clicked until after the E-mail Modification section has been completed. Please complete the E-mail Modification section before enabling the client access portal.
- Click [View History] to view a listing of all status changes. Notice that the comments left in the Client Access Setup - Status dialog box are available in the history.

- In the Email Notification area, the following options are available:
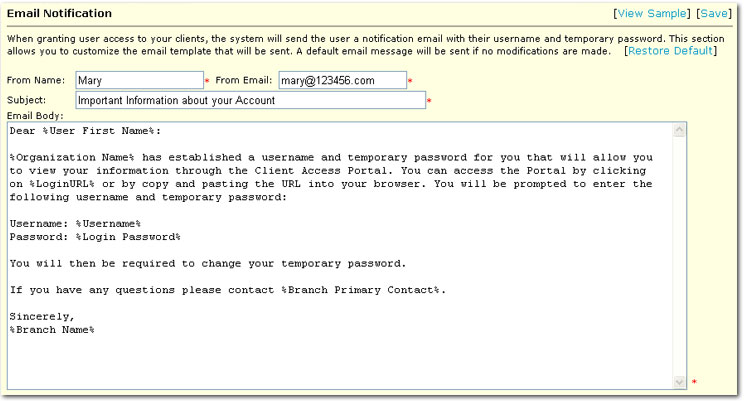
- Click the [Restore Default] link to return each of the following boxes to their default values.
- In the From name box, enter the name of the email notification sender. This can be a name, such as Mary Jones or the branch name.
- In the From email box, enter the email address that will be displayed in the From line of the email.
Tip: All emails must be sent with a From email address present even if that email address does not receive emails.
- In the Subject box, enter the subject line that will be displayed on the email. The default subject can be used.
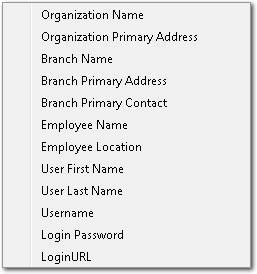
- In the Email Body box, enter the message that will be displayed on the notification email. Accept or customize the default message or create a completely new email. There are three variable values that must be present in all emails before the system will accept the email template:
User Name,
Login Password, and
Login URL
. When crafting a message, variables can be used to call information that may be different for each user. In the example above, the first line contains a variable for the user's name. A menu of variables is available by right-clicking in the Email Body box. Be sure to use your pointer to set the insertion point for the variable. The variable will appear surrounded by % on either side.
- After all entries have been made in the Email Notification area, click [Save]. The entries are saved. At this point the client access portal can be enabled.
- Click [View Sample] to open a preview of the email notification that has been set up. Generic values will replace the variables used. The agency and client specific values will appear in the email that is sent.

Client Access Main Menu